In a nutshell
- ✨ Use the fast aluminium foil method: near-boiling water + 1 tbsp baking soda per litre (optional salt), ensure contact with the foil for 2–5 minutes, then rinse and dry immediately.
- 🔬 Understand the science: tarnish is silver sulphide; an electrolytic reaction shifts sulphur to aluminium, restoring silver without harsh abrasion.
- 🛠️ For delicate pieces, apply a baking soda paste (3:1) with light pressure, use a soft brush for crevices, rinse warm, and dry with microfibre.
- ⚠️ Safety first: ventilate, wear gloves, do not mix metals (silver and stainless steel), limit time on patinated/lacquered items, and spot-test discreetly.
- 🧺 Keep shine longer: store with anti-tarnish strips in acid-free materials, avoid wool/rubber, and rinse off egg or vinegar residues promptly.
Brits love a sparkling table, and nothing lifts a Sunday roast like gleaming forks and knives. Yet silver hates the air we breathe. It darkens, sulks, loses its sparkle. Here’s the brilliant shortcut: baking soda, or sodium bicarbonate. Used wisely, it can turn greyed spoons bright in minutes, not hours. Forget pricey polishes for routine care; a cupboard staple restores shine fast and safely. Below, you’ll find the science, the speediest method, and the gentlest alternative for heirlooms. The goal is simple. Clean quickly, keep the character, and avoid needless abrasion. Your cutlery, back to best, with a kettle and a sheet of foil.
Why Silverware Tarnishes and Why Baking Soda Works
Tarnish isn’t dirt. It’s chemistry. Silver reacts with airborne sulphur compounds (think city pollution, wool, even eggs) to form silver sulphide, the black film that dulls shine. Stainless steel shrugs this off; silver does not. That’s where baking soda proves its worth. Used as part of an electrolytic reaction with aluminium foil, it helps convert silver sulphide back to metallic silver on the surface, rather than grinding it away. Clever, quick, and conserving.
The magic lies in contact and conductivity. Hot water dissolves bicarbonate, creating ions that allow a tiny current to pass between the aluminium and the silver. Sulphur prefers the aluminium, leaving your spoon cleaner and brighter. This is restoration rather than abrasion, which is safer for thinly plated items and family keepsakes. When the tarnish is patchy or intricate, a mild baking soda paste can assist in the crevices. But always remember: the less rubbing, the more silver you save for the next generation.
One caveat. Silver with intentional oxidation (darkened grooves) or pieces with delicate lacquers need caution and testing. If in doubt, trial on a hidden area first and keep contact times short.
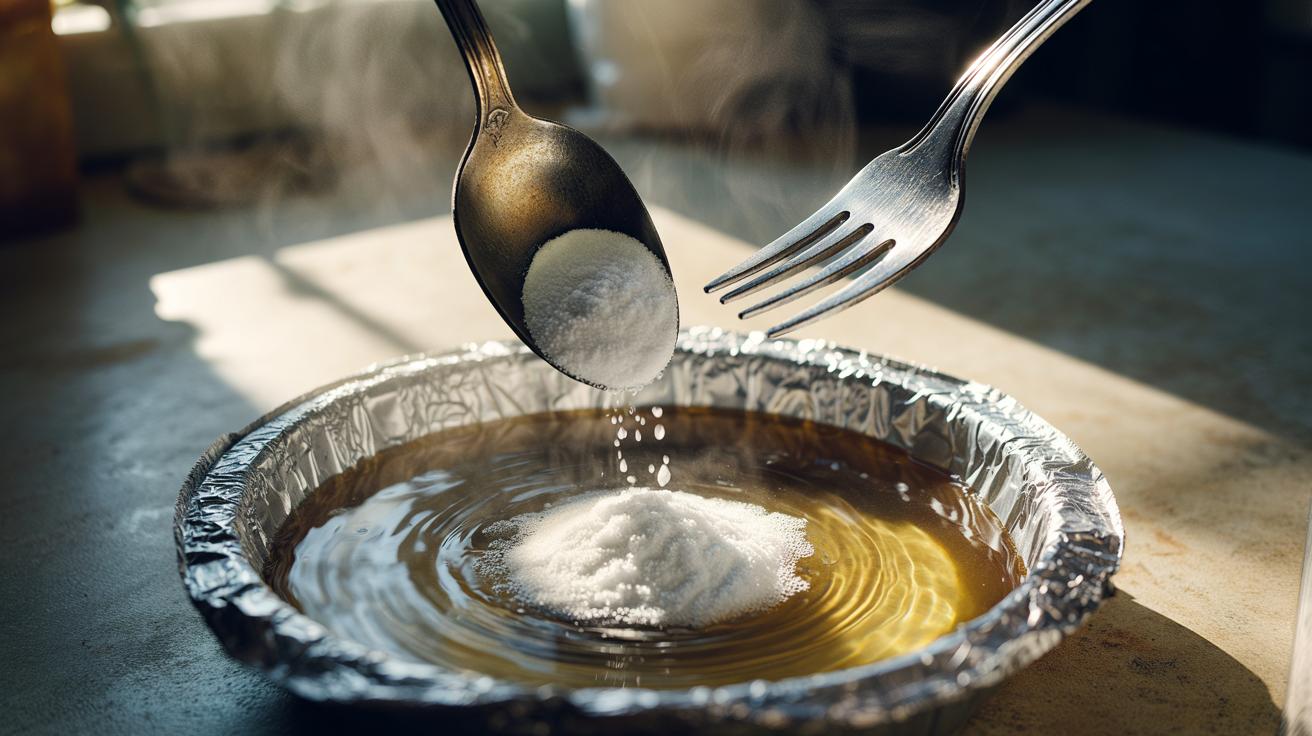
The Fast Aluminium Foil Method Step by Step
Line a heatproof dish with aluminium foil, shiny side up if you like. Add freshly boiled water from the kettle and stir in 1 tablespoon baking soda per litre. A teaspoon of ordinary salt can boost conductivity, though it’s optional. Place silver so it touches the foil; ensure pieces aren’t stacked tightly. Wait 2–5 minutes. You may notice a faint sulphurous whiff. Lift each piece carefully, rinse in hot water, then dry immediately with a soft microfibre cloth. Contact with the foil is essential for a rapid, even result.
| Variable | Guideline |
|---|---|
| Water temperature | Near boiling (just off the boil) |
| Bicarbonate ratio | 1 tbsp per litre (add 1 tsp salt if desired) |
| Soak time | 2–5 minutes, check every minute |
| Best for | Solid silver and lightly tarnished plate |
| Avoid/Limit | Patinated designs, glued stones, long soaks on thin plate |
Safety and finesse matter. Use ventilation, wear washing-up gloves, and never mix silver with stainless steel in the same bath. Different metals together can mark silver; keep only silver in the foil bath. For heavily encrusted areas, repeat briefly rather than overcooking. Then finish with a gentle buff to banish water spots. The effect is immediate: a revived, mirror-like surface without the slog of paste-only polishing.
When a Gentle Rub Is Better: Paste Cleaning and Finishing
Some pieces prefer tenderness. If your cutlery is intricately patterned, lightly plated, or set with materials best kept dry, use a baking soda paste: three parts bicarbonate to one part water for a spreadable cream. Apply with a damp cotton cloth, working in short, light strokes along the grain. For crevices, a soft baby toothbrush is ideal. Rinse thoroughly in warm water and pat dry. Always dry immediately to prevent mineral spots and new tarnish forming in minutes.
This method is mildly abrasive—use a featherlight touch. You’re not scouring; you’re coaxing. If you’ve already run the foil bath, a tiny dab of paste afterwards can lift any stubborn grey in deep scrollwork or near ferrules. Then finish with a clean, dry microfibre. Consider a last pass with a drop of washing-up liquid to cut residual film, rinse, and dry again. Shine loves patience, not pressure.
Keep it bright for longer. Store silver with anti-tarnish strips or in acid-free tissue, avoid rubber bands and wool, and never leave pieces sitting in eggy or vinegary residues. A fast rinse after serving can save an hour later. Treating silver as you would a favourite jumper—carefully, consistently—pays off at the table.
With a kettle, a spoon of baking soda, and a sheet of aluminium foil, you can reclaim sparkle before guests knock at the door. Science does the heavy lifting; you simply rinse and dry. For heirlooms, the gentle paste polish keeps detail intact and family history unscuffed. Small routines—quick rinses, dry storage, anti-tarnish aids—stretch the time between deep cleans dramatically. Ready to put the shine back into weeknight suppers and weekend roasts alike—no costly polish required? Which piece in your drawer will you brighten first, and what’s the story behind it?
Did you like it?4.4/5 (25)