In a nutshell
- 🌱 Tea bags provide slow-release nitrogen, trace minerals, and moisture retention, fueling lush, aromatic herb growth while feeding beneficial microbes.
- 🧪 The science: used tea gently shifts pH slightly acidic, supports soil biology, and works best as a soil amendment rather than a quick-acting fertiliser.
- 🛠️ How to use: bury a used tea bag 2–3cm deep near roots, brew a mild “leafy tea” drench every 10–14 days, or mix opened leaves into transplant holes.
- 🌿 Best matches: leafy herbs like basil, parsley, coriander, mint, and chives respond well; go sparingly with thyme and rosemary.
- ♻️ Avoid mistakes: skip plastic or perfumed bags, don’t overapply in soggy soils, and store used bags briefly to prevent mould and pests.
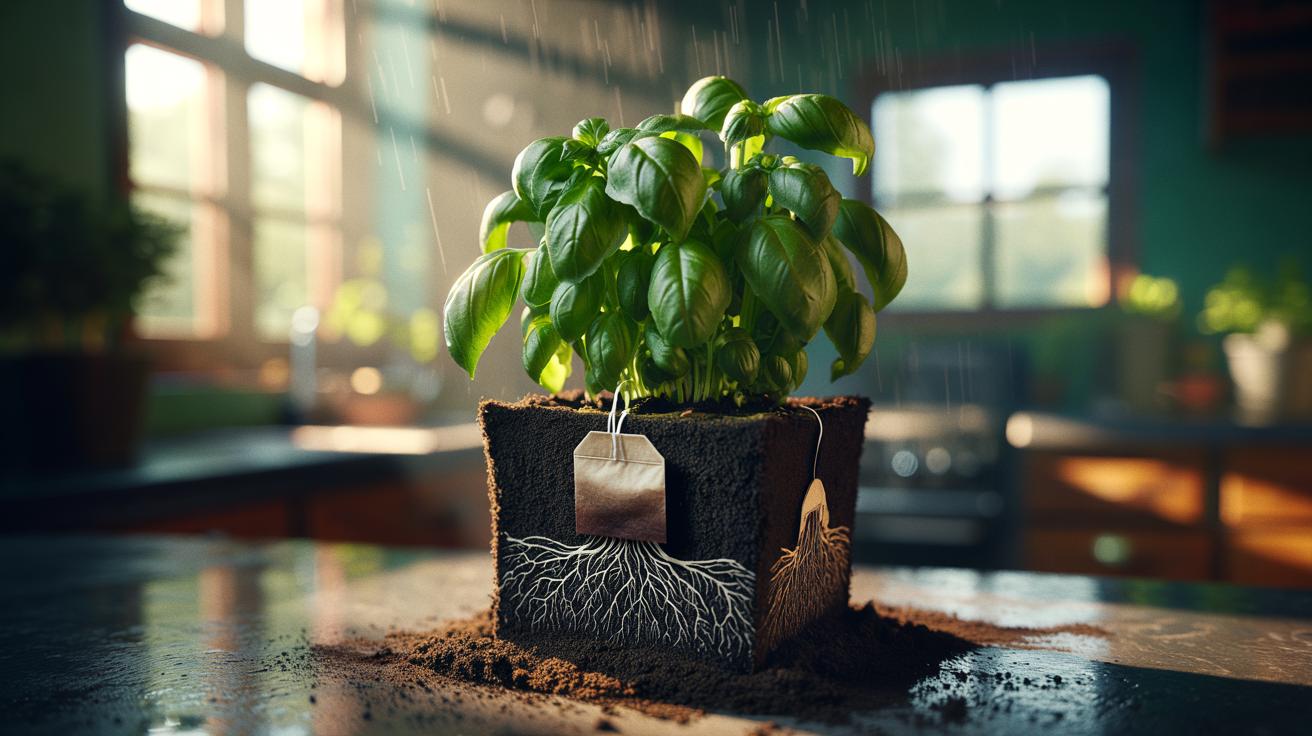
It looks like rubbish. It feeds your soil. A used tea bag slipped into a pot of basil or buried beside a patch of parsley can turbocharge growth with almost no effort. The trick is elegantly simple: spent leaves deliver slow-release nutrients, attract beneficial microbes, and help retain moisture around delicate roots. In a country of tea lovers, this is a tidy way to turn habit into harvest. From window boxes to allotments, the method scales, costs pennies, and cuts waste. Here’s how a humble bag becomes a quiet engine for lush, fragrant herbs you’ll want to snip daily.
Why a Tea Bag Works for Herbs
The power sits in the leaves. Spent tea still contains nitrogen for leafy growth, a touch of potassium for resilience, and trace minerals like magnesium and manganese. These are released gradually as the bag decomposes, giving a steady feed rather than a jolt. For herbs that you harvest little and often—basil, coriander, chives—that gentle rhythm suits perfectly. Slow-release nutrition equals steady, aromatic foliage.
There’s more beneath the surface. Tea’s carbon-rich fibres act as food for beneficial microbes, which then cycle nutrients into forms roots can absorb. This microbial bustle often improves root architecture, encouraging fine root hairs that forage more efficiently. The bag’s fibrous mat also holds a lick of moisture, reducing dry spells between waterings without waterlogging.
What about tannins? In small amounts they mildly acidify the rhizosphere and may suppress some pathogens. That’s handy for parsley and mint, slightly less so for lime-loving Mediterranean herbs, which prefer it on the sweet side. The caveat: avoid synthetic mesh or heavily perfumed tea bags. Choose unbleached paper, snip away staples, and you’re set for a clean, soil-friendly boost.
Step-by-Step: Using Tea Bags to Feed Roots
Start with a used tea bag, cooled and squeezed so it’s damp, not dripping. In pots, tuck it 2–3cm below the surface, about 3–5cm from the stem. In beds, plant it like a small bulb at spade’s depth of 5–7cm, just off the root zone. Close, but not touching the stem: that’s the sweet spot.
Prefer a quick drink? Brew a “leafy tea” by steeping one used bag in 500ml of dechlorinated water for 4–6 hours, then cool. Water the soil, not the foliage. Repeat every 10–14 days during active growth. For seedlings, halve the strength and apply sparingly once roots have taken.
Transplanting parsley or basil? Tear open a bag and mix the leaves with a handful of peat-free compost in the planting hole. This primes a microbe-rich pocket that helps herbs settle faster and resist shock. Keep the paper out if it’s synthetic; paper-only bags can go in whole.
Timing matters. Avoid piling bags or drenching the same spot weekly—excess organic matter can sour poorly drained soils. One bag per 1–2 litre pot each month is plenty. In open ground, think one bag per small cluster of herbs monthly through the growing season.
Smart Science: Nutrients, Microbes, and pH
Tea leaves aren’t fertiliser in a bottle; they’re a soil amendment that nudges the ecosystem in your favour. Nitrogen and micronutrients leach gently, while polyphenols and sugars feed fungi and bacteria that shuttle nutrients to roots. Expect subtlety over spectacle. Healthy soil biology is the engine, the tea bag is the starter.
pH? Used tea tends to be mildly acidic. Many culinary herbs sit happily around neutral to slightly alkaline, but leafier, fast-growing species tolerate a small acid nudge. For rosemary, thyme, and lavender, keep tea inputs light and occasional. If your tap water is hard—a common UK quirk—the alkalinity often balances the tea’s acidity, especially in containers watered routinely.
Two extra tweaks boost outcomes. First, let tap water stand overnight or use rainwater so chlorine doesn’t knock back microbes. Second, caffeine is largely spent after brewing, yet traces remain; using used rather than fresh bags avoids any risk of stimulating fungal gnats or stressing seedlings. Partner the practice with a good mulch and peat-free compost, and you’ll stack marginal gains that show up as denser, more fragrant foliage.
Best Herbs and How Often to Apply
Some herbs lap up the added biology and moisture; others prefer it lean. Leafy annuals respond most visibly, while woody perennials want restraint. The key is matching the tea bag’s gentle feed and microbial lift to each plant’s tastes. Start small, watch growth and aroma, then adjust the schedule. Observation beats rigid rules in every garden.
Use the guide below as a practical baseline for pots and small beds. Increase intervals if your compost is already rich, or if containers sit in low light where growth slows. In very free-draining mixes, a tea bag can reduce watering stress between hot days, especially for thirsty herbs like mint and basil.
| Herb | Benefit | Suggested Frequency | Notes |
|---|---|---|---|
| Basil | Lusher leaves, steady growth | Every 2 weeks (tea drench) or 1 bag/month in soil | Keep evenly moist; avoid cold drafts |
| Parsley | Deeper green, stronger flavour | 1 bag/month near roots | Likes mild acidity; rich soil helps |
| Coriander | Improved early vigour | Light drench every 2–3 weeks | Bolts in heat; partial shade helps |
| Mint | Thicker mats, moisture buffer | 1 bag/month; avoid waterlogging | Contain roots; can dominate beds |
| Chives | Repeat flushes of shoots | Every 3–4 weeks | Trim regularly to refresh clumps |
| Thyme/Rosemary | Minimal benefit | Once per season at most | Prefer lean, free-draining, slightly alkaline soils |
For sage and oregano, treat like thyme—sparingly. If leaves yellow despite feeds, check drainage and light before adding more organic inputs. Most problems come from wet feet, not hunger.
Common Mistakes and Sustainable Choices
Not all tea bags belong in soil. Some modern bags use heat-sealed plastics or nylon meshes that linger in beds for years. Choose plastic-free, unbleached paper bags, or simply split the bag and use the leaves. Remove staples and labels. If in doubt, open the bag and add only the leaves.
Avoid flavoured or oily blends—bergamot, vanilla, chai oils can confuse soil biology and attract pests. Green and black tea leaves are safest; herbal infusions vary wildly. Watch for mouldy build-up if you add bags faster than they decompose, particularly in cool, waterlogged composts. Space them out, and keep the crown of each plant dry and airy.
Storage counts. Keep used bags in a ventilated tub, sprinkle a little dry compost between layers, and use within a week. For a bigger boost, combine tea leaves with crushed eggshells for calcium and a pinch of rock dust. That creates a balanced, low-waste tonic that supports structure as well as growth, without the spike-and-crash of synthetic feeds.
One used tea bag can change the rhythm of a pot. Cheaper than bottled feed, kinder to soil, and in tune with a nation that brews by instinct, it’s a quietly radical gardening habit. Test it on a single pot, observe, refine, repeat. Your herbs will tell you what they want—faster growth, fuller flavour, fewer droops between waterings. Ready to turn your next cuppa into a crop, and which herb will you trial first on the windowsill?
Did you like it?4.3/5 (28)